Showing posts with label Desserts. Show all posts

Friday, November 20, 2015

Mini Custard Puff Pastries - Pastelis De Natas


Mini Custard Puff Pastries - Pastelis De Natas


These are Portuguese Custard Tarts / Pasteis de Natas, devotedly handmade to a 300-from a year-old recipe, with a thick creamy egg custard, sitting comfortably in a cozy puff of puff pastry and just asking to be eaten.


Enjoy them with a sprinkling of berries or stick religiously to tradition. Also, add other things to it, like icing sugar or cinnamon.

Want more traditional.

Now you know that the typical Portuguese Pastelis De Natas is a little bigger and a bit browner on the top, but this is the way I like it and made it smaller for a two-bite treat. I just find that my guests like this better.


If you want them more traditional, then just make the puff pastry about 50% larger and a bit thicker. Also, bake it a bit longer to get more of the browning on top...
Any way you make them, they will be awesome.


*************************************************************************************************************


Recipe;

I Pkg. - Pre-made pastry dough.

1 1/2  Cups - Whole milk
1 Egg -  Whole
2 Egg -  Yolks
1 Stick - Cinnamon
1/ 2  - lemon peel

1 Cup - Water
1 to 1 1/2 Cups -  Sugar

1 to 2 Tsp. - Vanilla extract
2 Tbsp. - Corn starch


For more information, please see the video below; 


*************************************************************************************************************


After pressing the dough down, use your thumbs to press it to the sides of the tray pockets. If you keep moving the tray around, so your fingers are always pressing the dough away from you, will make it easier. 

For a larger custard, then add about 50% more dough and  let it be a bit higher in the tray pocket rim. 


After the tray has been in a hot oven for about 10 to 12 minutes, bring it out, and then push the middle down in order to create a center pocket in the dough. It will all adjust when you add the custard and fill out. 


Add as much as you want of lemon peel and cinnamon. Have it as tart as you would like. 

Remember not to let it go to a full boil, but only a simmering boil. Once it reaches its simmer, then let it go for 3 minutes, but keep an eye on it.   For it could overfill the pot and make a mess. 


Add the corn starch when the mixture is starting to get warm, if it gets too hot then it will become globes of dough. 


As you reach this stage, it is very important to keep on stirring so it will not burn and we want a smooth blend. 


When the hot mixture sticks to your whisk and slowly slides off slowly, then you know it is ready. 
  
Caution is needed to keep on stirring, because as the custard becomes thicker, then the chances of it burning will increase. 


*************************************************************************************************************


Mini Custard Puff Pastries - Pastelis De Natas
Video


If You Like This Video, Then You Will Love Theses. 
By Cookingaround;


Chocolate Pudding
Video


Nutella Cheesecake
Video


Creamy Kiwi Cheese Cake
Video


Please share with your Friends and Family, below;


Thursday, October 22, 2015

Apple Roses Bake Recipe


Apple Roses Bake Recipe

Well, it was raining for about three days straight and I really needed something to change my mood from being stuck indoors. After checking the food storage area, I found that I still had a lot of apples from my garden. 

So off to the kitchen to make these awesome aromatic Apple Roses. The problem I had was to make about a dozen or so, but as they came out of the oven filling the air with baked apple and cinnamon, they did not even make it to a plate. They disappeared as fast as I could make them.

I hope you will try this recipe and let me know how it turned out and did you add anything different to it.


*************************************************************************************************************


Recipe; 

2 to 3 - Apples
1 to 2 Pkg. - Pre-ready pastry dough (makes 6 to 8 pieces each)
1 to 1 1/2 Ltrs or 3 to 4 pints of water
1/2 - Juice of a lemon

Cinnamon as needed
Powdered sugar as needed

Makes about 12 to 18 Apple Roses


For more information, please see the video below;


*************************************************************************************************************


By using apples that have more red in it, it gives off a nicer color like a rose.  Here I use a combination of different colors just to have more variety to show on the video. 


If you do not like to use the microwave oven for this stage then you can boil the water with the lemon and apples for about 3 minutes. Either way, it will work out.


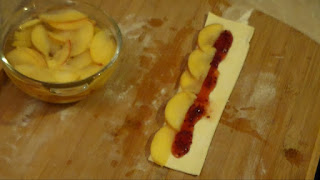
In the video, I am using a homemade raspberry jam that was from my garden. Now go ahead and add really any type of jam that you would like. 


If you would like a lighter pastry, then you can roll the dough a little, but I find that I like it the way it was made.

By making the roses a little smaller, then you could get about 4 sections from each side by slicing 3 horizontal and 1 vertical. This will give you 8 sections. 


Please do not overfill the sections with jam and apples, for it will make it harder for you to roll it and the jam will boil off everywhere and make a mess. 


You can find that as you start to roll the rose, the apples will try to move out of position. Keep one of your fingers on the top of the apple slices as you roll and that will keep them in place. 

Remember "practice makes perfect". 


Use a Teflon baking dish or make sure that you pre-treat it before you bake it so the roses will just slide off. 


*************************************************************************************************************


Apple Roses Bake Recipe
Video


If You Liked This Video Then You Will Love These. 
By Cookingaround;


Apple Tarts - My Way
Video


Pizza Apple Pie
Video


Apple Cinnamon Loaf
Video


Please share with your Family and Friends, below;

Monday, June 8, 2015

Mushroom Breadsticks - Pierogi Szwedzkie


Mushroom Breadsticks - Pierogi Szwedzkie


I remember when my Girlfriend  took me to a restaurant in Krakow Poland for the first time that served a very  strange pierogi. It was on display and it looked like something I never saw before. Being, at least  2 feet long I thought, how can they make any money just selling this funny mushroom breadstick. 

As it turned out, it was really a great meal, and I have to say that the place seemed to be full all the time, everyone gobbling  the thing down.   It was quite an experience and I have to admit that I did go back a few times. 

That is why I just had to come home and copycatted the recipe. Now that was not easy, but I stuck to it and it came out awesome like the real thing. it may not be as long as theirs  but just as tasty. 

Go ahead and try it, I am sure that it will be a pleaser. Please let me know how yours turned out. 


*************************************************************************************************************


Recipe:

1 lbs. -  Button or any type mushrooms
1/2 Cup - Butter
1 - Medium - Onion
1 Tsp. - Vinegar
1/2 Tsp. - Salt
1/2 Tsp. - Pepper


Topping 
1 - Egg yolk
Splash of water.

Black cumin as needed


Dough
Ready-made or homemade

2 cups - All purpose flour
1 Pkg. - Yeast
Pinch of salt
Splash of milk
2 Tsp. - Cooking oil
Water as needed


For more information please see the video below; 


*************************************************************************************************************


It is very important to let most of the water to evaporate from the mushrooms. I would say about 90% of it. Please do not think of draining the excess water and being done with it, because that is where the flavour is and I want to keep it in the mushroom, not down the drain.

Keep the mushroom piled in the middle and that will make the drying process go faster.Keep on stirring on the sides and piling it.  


Only add the butter and vinegar when the water has evaporated. If you skip this process, then your mushrooms will be very soggy and have no taste.


To make your life easier you can buy the ready-mix dough at your Supermarket or you make it from scratch. Here I used my food processor to mix up my dough then I let it rest for about 2 hours.


Your dough should be as thin as possible because you do not want a large puffy crust but a nice smooth and round finish.


Now you do not have to use the cardboard stencil like I did here, but I find this keeps them the same size. It takes out the guessing game of trying it free hand. 


Make a line with your mushroom mix and please try not to spread it around too much because then it will make  it harder to lock in the dough with mushroom at the sealing point. 

If you find that the dough slices have shrunken a bit, then just roll it a few times to get it back to its shape.


Now just roll it over and tap it in. making sure that the mushroom is in the rolled part.


Just roll the whole thing over and there you go, a perfect  breadstick.


Here I am using cornmeal so the dough will not stick when I am baking it. Now you can use other methods or even baking papers. 


Add the egg wash to  the tops of the sticks. Now I usually do not do the sides because I find that the yolk  accumulates at the bottom of the breadstick and burns during the baking. So I just cover the sides. 


Now to top it off "The Black Cumin". This gives a nice around taste  to this dish and this type of cumin is good for you. It just finishes it off to a perfect Breadstick. 


Your friends and Family will all love this recipe.

That I promise.


*************************************************************************************************************


Mushroom Breadsticks - Pierogi Szwedzkie
Video


Now If You Liked This Video Then You Will Love These.
 By: Cookingaround 


Mushroom Sauce  for Pasta
Video


Russian Perogies - Rosyjski Pierogi
Video


Magic Diet Soup -  The In-Between Soup  # 1
Video


Please Share with your Friends and family, below; 

Thursday, March 19, 2015

Nutella Cheesecake Recipe


Nutella Cheesecake Recipe


How much do I love Cheesecake, let me see. I can start  "one hundred and one"  and keep on going. Of course,  this one is my favorite dish as far as Cheesecake goes, the chocolatey nutty flavour of Nutella is the best. When I make this dish for my friends, for a Party or a Gathering at my place, it does seem to disappear very fast and they still ask for more. After all,  this is an easy recipe and there would really be no effort to making some extra. 

I like my cheesecake to be soft and smooth, just like a pudding. As for the other type that is a bit hard or softer, but more of a harder cream is all well and done for some, but as for me the softer without it melting is the way to go. 

So please try it and let me know how yours turned out. 


**********************************************************************************************************

Recipe;

Pie Crust;
4 Cups - Crushed Graham crackers or sweet plain cookies.
1/2 to 1/3 Cup - Melted butter
1 Tbsp. - Nutella


Cheese Filling;
1 lbs. - Cream cheese (plain)
1/2 to 1/3 Cup - Icing sugar
8 Oz. - Nuttela  (1 glass cup)


Topping; 
1 1/2 Cups - Whole milk
1/4 Cup-  Sugar
2 to 3 Tbsp. - Corn starch
1 Tsp.- Vanilla extract
1 - Egg yolk
Dash - Salt (option)
1 Tbsp. - Butter (option)

Mixed with topping;
3 Cups - Whipped cream


For more information, please see video below. 


**********************************************************************************************************


Now here,  you can add as much butter as you want. I added only enough to keep the crackers or cookie mixture together. 

Add only a little at a time and keep stirring to get it well mixed in. Only when the mixture can be compacted,  stays to the side of the bowl and holds together, it is ready for forming.  


Bake, no bake  this is really up to you. This pie crust recipe can be done either way. this crust will hold without baking and it will be just as good and not affect the taste to this desert. But I like to bake it for a few minutes because I like the firmness of the crust next to the softness of the filling. 

Try it both ways and see which one you like better.


Add sugar according to your taste. For in North America and some Country's they like it to be sweeter, but here in Europe they tend to like it a little less sweet.

So make it your own and add more or less sugar to the mix.


This is where you would control the softness of your topping. By adding more cornstarch, say around another tablespoon or so, will make your topping a little bit  harder in texture. 

Now I would not make it any lesser than the recipe of 2 tablespoons for then the topping will run and not hold together. 


Add whatever topping you want to the finished Cheesecake. Her I am adding some powdered chocolate, but there are so many other alternatives. 

Make it your way.


**********************************************************************************************************


Nutella Cheesecake Recipe
Video


If You Like This Video Then You Will Love These. 
By: Cookingaround 


Creamy Kiwi Cheese Cake - No Bake
Video


Orange Cranberry Loaf Cake
Video


Chocolate Gone Wild
Video


Please share with your Family and Friends, below;


Wednesday, March 11, 2015

Creamy Kiwi Cheese Cake - No Bake


Creamy Kiwi Cheese Cake - No Bake

Aww ! The Cheesecake and a Kiwi Cheesecake, my favorite. Now I like this no baking of the cake because I like the cheese to be soft and smooth, not the harden one that is backed. I am not saying that the baked one is better, for they are just as awesome, it's just my preference to like it to melt in my mouth more like a pudding.


So either way you make it, it will be out of this world. Please let me know how yours turned out and did you make a better decoration on top than I did.


***********************************************************************************************************


Recipe; 

Crust;
2 Pkg.(1/4 lb.) - Graham crackers or sweet plain cookies.
1/2 to 1/3 Cup - Melted butter
2 to 3 Tbsp. - Brown sugar

Filling;
1 lb. - Cheam cheese
1 Cup - Heavy whipping cream
3/4 to 1 Cup - Powered sugar
2 Tsp. - Vanilla extract

Topping; 
4 to 6 - Peeled Kiwi
3 to 4 Tbsp. - White sugar
2/3 Cup - Water
2 to 3 Tbsp. - Powered gelatin
1 to 2 Each - Sliced kiwi

Option;
Green food colouring for the topping.


Note;
- Pie crust can be baked or used as is in the pie form.


For more information and procedures, please see video below; 


***********************************************************************************************************


Now I did say "no bake" and this is a no bake Cheesecake recipe, and I stand by my word. This crust does not have to be baked and can be used just as is. 

Now baking this for me only takes about a 6 to 7 minutes and I like to have a harder crust, but it will turn out just as good without the baking, but with  more of a  flaky softer crust. 


In the video, I am using 18% cream to keep it on the lighter side, but you can use a heavier if you wish. 

If you are in a hurry, then just use the pre-made whipped cream and it will be just as good. The one that comes in a tub. 


Now how jelled to you want your topping. This is easy to control by using less or more gelatin to control your topping mix. 

Some commercial  bakeries,  on the topping mix, add some green food colouring to make it  a stronger green to stand out the kiwi more. It really will not hurt the taste and you can get a food colouring that is a natural food product. Here on mine, I did not use it. 


Just to make your life easier, let the pie with the filling cool off a bit in the fridge just before you add the topping.

Remember that the topping should be cooled off before adding it. I add cold water to a large bowl and put my working pot with the mix, into the water to cool faster. Do not let it cool down too much, for then it will turn into a solid jelly and not pour right.


***********************************************************************************************************


Creamy Kiwi Cheese Cake - No Bake
Video


If You Liked This Video Than You Will Love These. 
By: Cookingaround 


No Bake Cookies - No Fuss
Video


Chocolate Gone Wild - Chocolaty Goodness
Video


Please do not forget to share with your Family and friends, below; 


Thursday, September 11, 2014

Chocolate Pudding - Gone Wild


Chocolate Pudding - Gone Wild 


Do you like chocolate pudding but do not like all the fuss, are you one that goes out and make it with the instant one, just add water and there you go.  Could be that you think it’s too complicated, well it’s far from the truth. It’s so easy that once you try it you will never stop.

Ok  so now I will show you how to make the pudding all in one pot. Just add all the  ingredients  and do a little bit of stirring and there you go.  It’s so easy. Just follow it step by step on my video and in a few minutes your whole family  will be smacking their lips on your treat that you made at home.


Try it with other goodies like Oreo cookies  for other of your favorite things, really you cannot go wrong with this recipe. Please let me know how yours turned out.  


**********************************************************************************************************

Recipe;

1/3 Cup - Cocoa powder

2 1/3 Cup - Milk
1/3 Cup - Sugar
2 Tbsp. - Butter
3 Tbsp. - Corn starch
1 Pkg. - Vanilla extract powder (sugary type)


Filling 
Any chocolate bar or cookies
Any liqueur

Topping 
Whipped cream

Alternative 
1/2 Cup Sugar and 1 tsp. liquid vanilla extract.


For more information please see video below. 


**********************************************************************************************************


Its very important to keep the heat down on low in order to help in the melting of the butter and mixing in the  ingredients. If it's to high at this stage then it could burn the butter and the mixing of the other things can turn into lumps. 


How much  coco you will  use  depends  on the type you use, it can be 70%  to light chocolate. 

So after adding the first batch of coco then taste it and see it you want more of a  chocolaty taste or not. This really depends on you.

Also you can add more sugar it you want that more of a "sweet tooth" thing... 


Now that everything is in the pot and you have now increased the heat to medium. It's stirring time and you must keep doing it until it becomes thick. Always keep stirring  at the bottom and on the sides so it will not burn and you will get a nice even creamy pudding. 


When the pudding  forms a thick line from the mixture to your stirrer, it's done. Now let it cool for about 10 minutes or so and then it's ready for the dessert dishes.  


**********************************************************************************************************


Chocolate Pudding - Gone Wild 
 Video


If You Like This Recipe, Then You Will Love These All By Cookingaround.


Rice Pudding, Creamy Smooth
Video


Yes "Beets" Chocolate Cupcake's
Video 


No Bake Cookies - No Fuss
Video


Please share with your Family and Friends below;

Monday, February 3, 2014

Apple Cinnamon Loaf Cake


Apple Cinnamon Loaf Cake

Now what can go better together then  apples and cinnamon, a great  combination.  I had some friends from my local Pub ask  me to bring them some cake  after  watching one of my videos, so off  to the kitchen I went.  Hi ho hi ho  off to work we go.

I  really like cake but I do not like all the work of  making it the regular  complicated  way, that’s way  I use a loaf  pan.  Just  mix   and bake,  if you want something on top then just added it to the top and there you go……..Done  fast and easy with no fuss.


Try it and please let me know how it turned out…..:) 


*******************************************************************************************************

Recipe....

1 1/2 Cups - all purpose flour
1/3 Cup - Brown sugar
2/3 Cup - White sugar
1/2 Cup - Butter
1 Lg. -  Apple
2 - Eggs
1 Tsp. - Cinnamon
1 3/4 Tsp. - Baking powder
1/2 Cup - Milk, more as necessary

Options
1/3  Cup - Almonds
1/3  Cup - Walnuts

Please see video below for more information. 

*******************************************************************************************************


Apple and cinnamon really goes good together and it gives off an awesome aroma  while you are baking it. Now at this point you can add some walnuts or almonds, whatever you want, make it your way.


At this point add only half of the mixture and half of the  apple and cinnamon. Do not press it down but allow it just to stay on the top.


Add the other half to the loaf pan and the half of the apple mix. We do not want to press or blend it in for we want it to bake on top for an awesome topping that all your friends will cry for.


Grab a toothpick and stab it around the middle of the loaf  and see if it is dry and if it is done. Just remember that the apples are still moist and it could give you some off readings. Now if it's been in the oven for the at least 50 mins., then it's probably done. 
*******************************************************************************************************
Apple Cinnamon Loaf Cake
Video 


Please share with your Family and Friends below; 
Related Posts Plugin for WordPress, Blogger...