Showing posts with label Breakfast. Show all posts

Thursday, September 3, 2020

Fat-Belly Burner Salad Recipe


Fat-Belly Burner Salad Recipe 

Is your belly protruding out just a little and you cannot understand why? Well, mostly it could be a system that has some gas built up or "yes" a bit of backlog. Either way, this salad clean and bring up your system right up to par and reduce your belly.  

Well here go again with an awesome salad that is just what we need from time to time. This salad may not look like it has much but do not let it fool you. This salad comes with a punch when it comes to giving you a lift when you need it and will give you a cleansing feeling in your body, as it starts to work.

It has just the right combination of nutrients, vitamins, and roughage to get the job done in one meal.  Immediately you should feel and get a pick-me-up feeling of well being in a short while for this salad has that effect on people.

Do not think that this salad was taken from the internet, yes there is some like this but and yes a big "but", there is a difference with it.  I have actually experimented with this salad with many different ingredients over and over again tell it was perfect. I used my Girlfriend, myself, and friends to try it as a meal and report back to me. The result was awesome on taste and they all said that they found themselves full of energy and all got a great feeling of calm in their body after eating it.

So here it is all ready for you and tested through and through. Please let me know how it worked for you.


Now what do the experts say "why" this works.

World’s Healthiest Foods Sector reports that cruciferous vegetables (such as broccoli, kale, cauliflower, cabbage, watercress, and mustard greens) are said to be detoxifying because they provide support for the immune system, inflammatory system, hormonal system, detoxification system, and antioxidant system 

These vegetables contain a wide variety of vitamins and minerals as well as phytonutrients. For example, one such group of phytonutrients found in cruciferous vegetables are called glucosinolates. Glucosinolates are thought to have anti-cancer properties in a variety of research studies. World’s healthiest Foods also suggest consuming 3 servings of cruciferous vegetables each week for maximum benefit.


Caution

Remember that if you feel and/or see anything out of the norm with your body, you should always seek out some medical doctor's advice.


*****************************************************************************************************************


Recipe;


1 Med.         -   Head Broccoli

1/2               -   Leek
1 lg.             -   Carrot
1/2 cup        -   Corn
1/4 cup        -   Parsley
1/2  tsp.       -   Sugar
1/2 tsp.        -   Garlic salt.
1 tsp.           -   Sweet paprika powder
1/4 cup        -   Vinegar
1 tbsp.         -   Olive oil
1/2 med.      -  Juice of a lemon

Salt and pepper to taste. 


Options 

3 tbsp. - Mayo low-fat
3 tbsp. - Sour cream
Sunflower seeds as needed 
Iceberg lettuce  as needed 


Toppings

Sunflower seeds and/or raisins as needed
Fresh mint leaves


Makes two serving under 300 Calories each serving. 

Use as much as necessary. 


For more information please see the video below;


*****************************************************************************************************************


Add all the carrots first to the food processor for because of being harder it will not over chop the broccoli if there were together. 

When the carrots are not cooked and are raw will be low on the GI scale so have as much as you want without the worry. 


I would add the broccoli here in two parts because adding to much will over chop it on the bottom of the processor and have big chunks of it on top and it could turn out not even. 

I used only the pulse setting in order to have more control of the chopping process.


Add as much as you want of the lemon for this juice pulls all the flavor together and helps digest the broccoli in your system .

If you do add more it will not hurt the salad but it could make it to acidity for some. So taste it as you add a little at a time to be on the safe side. 


Now here comes the mayo and I had to add this because it really makes this dish a nice creamy sauce, but if you are counting calories then just reduce the amount or admit it all together. By not adding it, it will not affect the detoxing factor of the salad. It is just for a more rich taste that is added to this. 


Go ahead and add all the fresh parsley that your heart fancy for it can never have enough for you know it's nature's perfect food and it does wonders for you.


*****************************************************************************************************************


Fat-Belly Burner Salad Recipe 
Video


If You Like These Videos Then You Will Love These Below.
By Cookingaround.


Original Cabbage Diet Soup - Lose 1 to 2 Lbs. Per Day - Guaranteed
Video


Lose 4 to 6 Lbs. Guaranteed - Magic 3 - Day Weight-loss Plan
Video


Please share with your Friends and Family below;

Thursday, August 27, 2020

Tuna Avocado Salad - Under 300 Calories


Tuna Avocado Salad - Under 300 Calories 

Well,  thank you, everyone, that supported my cabbage diet soup series, it was and is a great success and it helped many people to remove the weight.

But, man can not live on soup alone on soup, we will need some type of hard food with protein of sort. It has to be something that can help you keep those pounds off, something tastes good, is nutritious and low in calories. 

So here is the starting point of my new series of "Dishes Under 300 Calories". I hope everyone will follow this new low-calory diet. 

Now with this dish, we start with tuna and other things that will make this dish great-tasting and low-calorie. I hope you will enjoy this tuna salad and I am wishing everyone great health.


***************************************************************************************************  


Recipe;

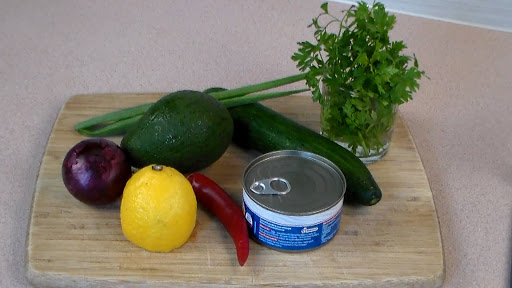
1 can             -   Chunky tuna in water

1 med.           -   Avocado 
1 med.           -   Red onion 
1 med.           -   Cucumber 
1/2 cup          -   Green onions 
1 sm.             -    Hot pepper 
2 tbsp.           -    Lemon juice 

Salt and pepper as needed. 


Garnishes 

Lemon or lime slices 
Fresh parsley 
Fresh dill   


Calories per serving -   230 calories,  1/2  of the recipe above. 


For more information, please see the video below. 


***********************************************************************************************  


Start with your favorite canned tuna and if this is a diet recipe for you then the tuna should be in water not in oil. The combination here is just perfect to help you hold your weigh and fill you up so you will not feel hungry very soon after eating. 


After removing the skin and core, slice it as thin or as thick as you want it. The avocado is this meal has  a nice round taste to add to this dish and it blends perfectly with the other ingredients.  


In this salad I like to use red onion, I know it is really more acidity and stronger than the average white onion but its higher sweet flavor makes this perfect for this dish. Also, it gives off some color and makes it more appetizing. 


When it comes to hot peppers that's your choice but remember that the hotness from these peppers make your metabolism go higher and that burns fat and your lose more weight. Now as for the inside seeds, well that's up to you. As for me, I like to add them to my soups but not to a salad for I do not want anything crunching in my salad.


Go ahead and finish it the way you want. Add lemon or lime slices, some fresh parsley, or fresh dill. After all, this is your dish and you should make it your way. 


***********************************************************************************************  


Tuna Avocado Salad - Under 300 Calories 
Video 


If You Like These Videos Then You Will Love These Below.
By Cookingaround:


Skinny Parsley Omelet - Under 300 Calories
Video


Broccoli Detox Salad - Under 300 Calories
Video 


Please share with your Friends and Family below;


Friday, August 21, 2020

Skinny Parsley Omelet - Under 300 Calories


Skinny Parsley Omelet - Under 300 Calories

Well, because of all the diet foods and diet plans that I have created and it had a huge impact on many lives. A lot of people have lost their weight and fat because they followed the recipes and diet plans to a thing of perfection.

I get a lot of questions about breakfast for there is so much going on as per variety that some get confused about what to eat so they can stay on the plan. 

So I will be bringing up some recipes for a breakfast plan to give everyone some good choices that are healthy, nutritious, low in fat, and calories. 

Now here it is my "Parsley Omelet" low in fat and calories, simple to make and really fast. I hope you enjoy this recipe and please let me know how you made it or you had it your way. 


******************************************************************************************************************


Recipe: 

2                  -   Medium eggs
1/3 cup        -   Parsley (fresh) 
1/3 cup        -   Green onions (white and green)
1 tsp.           -   Cooking oil 
Splash         -   Whole milk 


Sides         

-   Sliced tomato 
-   Sliced cucumber 
-   Cubed watermelon


Calories 

155 cal.  -  2 med. eggs
  35 cal.  -  Parsley 
  35 cal.  -  Green onions 
  10 cal.  -  Whole milk 
  40 cal.  -  Cooking oil    


For more information, please see the video below: 


******************************************************************************************************************


What could be better then the nutritious recipe upbove for Breakfast. The ingredients are few and very simple to combine together. But, rest ashored that this onelet is awesome tasting and under  300 calories. 


By adding a little bit of milk, it will make your omelet more fluffy and lighter. You can use really any kind of milk. Here I am using whole milk for I find that with this type I get more consistency in the cooking. 


It is important to beat the eggs really thoroughly until you see air bubbles in the mixture. It is the mixing of the eggs and the milk to get enough air into the eggs and to breakdown the fats. Rule of thumb beat it approximately about a hundred times or more.  


Do not overcook the green onions and the parsley for we want them crispy and not mushy. I like to use cooking oil here because it gives a nice round flavor to the greens. Add the cooked greens to the egg mixture only on the last minute for again I do not want a mushy mess. Remember that if the pan is not hot enough then the omelet will not turn out right and it could give you trouble turning it. 


After you add the eggs into the hot pan, I would ask you to count to ten without touching the mixture. By waiting it will give it enough time to let the eggs cook without sticking to the pan. Then start by pulling a little of the omelet from the corners and tilting the pan in order to let the eggs fill into the empty slots. Now you will get a more consistent and even cooked omelet. 


Please do not overcook the omelet, remember that even when you remove it from the pan it will still continue to cook for a couple of minutes. You can flip it over to a half or into a double flip, it's your omelet, so make it your way. 


******************************************************************************************************************


Skinny Parsley Omelet - Under 300 Calories
Video


If You Like These Videos Then You Will Love These Below.
By Cookingaround:


Blueberry Pancakes Recipe
Video


Bacon And Eggs - My Way
Video


Please share with your Friends and Family below;

Friday, August 14, 2020

Original Cabbage Diet Soup - Lose 1 to 2 Lbs. Per Day - Guaranteed.


Original Cabbage Diet Soup - Lose 1 to 2 Lbs. Per Day - Guaranteed.


Well here it is, you asked for it and now you got it.

Everyone or most everyone seems to love my Diet Plans but some were asking for a simpler recipe. One that is easier to lose weight but can be used on and off on an as-needed base. So here it is the original cabbage soup recipe that has been used for centuries to lose fat and at the same time keep your body with the proper health factors as it needs. 

All you have to do is have a very simple breakfast and eat the soup for lunch and dinner. Like my other diet soups the more you eat the more you lose the weight. Below I will give you the plan to follow.

The only thing that I added to this soup is the hot peppers and other hot spices, these are important to your weight loss because it increases your metabolism.  Metabolism is what helps with you losing the fat because your body will become more energized.  

Stay on it as long as you like but I would rest the diet soup in-between with some normal low-fat foods especially getting some protein into your system.  
 
Wishing you all the BEST of health. 


*****************************************************************************************************************


For Breakfast:

Have a limited Breakfast of; 

Toast, boiled or poached eggs, high-fiber cereals, low-fat milk, grapefruit, banana (one), low-sugar fruits, oatmeal, etc. 

Coffee or tea with little sugar. 


Soup Recipe: 

1/3 - Med. size cabbage.

2  Lg.         - Tomatoes
3  cups       - Tomato sauce 
1/4 cup      -  Tomato paste
2 to 3         -  Green onions
1 cup         -  White or green beans
1 to 3         -  Stems  celery 
1 to 2         -  Red or green bell peppers
2  ea.         -  Veggie stock, low-sodium 
2 tsp.         -  Ground cumin
2 tsp.         -  Sweet paprika 
1 tsp.         -  Hot Chili powder 


Options:

1 -2  tsp.       -  Prepared mustered 
1 med.          - Fresh hot pepper 
2 to 3            - Minced garlic 
1/2 cup         - Parsley 

Ground pepper - As needed 
Salt  - Only if necessary 


For more information please see the video below; 


*****************************************************************************************************************


Start with fresh vegetables and do not be afraid to add some other things that you like. As for spices or herbs add as much as you want or your favorite ones. Make it your way. One of the most important ingredients is the hot spices to increase your metabolism.


Try to slice the cabbage as fine as you can but on the other hand, maybe you would like it with larger slices. It is really up to you. 


Chop up all the vegetables into mouth size pieces. In this way, it is easier to cook, digest, and eat. 


Star off with medium heat and when you finish adding everything, bring it to a boil, cover it and set it on low for 40 minutes. 

Now if you find that you are having digestive problems because of the high fiber, then cook it for a longer time. 


Now go ahead and enjoy the cabbage soup. Remember that the more you eat the more you lose but this time you are in control of your diet. 


*****************************************************************************************************************


Original Cabbage Diet Soup - Lose 1 to 2 Lbs. Per Day Guaranteed.
Video


If You Like These Videos Then You Will Love These Below.
By Cookingaround.


Lose 4 to 6 Lbs. Guaranteed - Magic 3 - Day Weight-loss Plan
Video


Lose 10 to 17 Lbs. Guaranteed - Magic 7 - Day Weight-loss Plan
Video


Please share with your Friends and Family below;

Tuesday, February 16, 2016

The Best French Toast Recipe


The Best French Toast Recipe


There is nothing better than the smell of buttered French Toast with a hint of cinnamon coming from your Kitchen. What a special treat it is to have this dish to start your day. 

All in all,  this is one of my favorite dishes for breakfast, so easy and fast to make. Now with all the different toppings that you can have, makes this the perfect "start for your day". As for me, it is butter, cinnamon, and the best of the best "Canadian maple Syrop". 

Go ahead and try this awesome recipe and please tell me what did you add for the toppings. 


***********************************************************************************************************


Recipe;

4 Slices  - Sliced toast bread or any other type of bread.
1 - Egg
1/2 Tsp. - Vanilla extract
1/4 Cup -  Milk
Butter as needed

Toppings;
Butter
Cinnamon
Maple syrup
Icing sugar
Any fruit


For more information, please see video below. 


***********************************************************************************************************


What other breakfast can you make for your family that is so fast and easy. This combination of the bread, egg, and toppings, makes this an outstanding dish. 


Make sure that you beat the egg mixture, very well until it is velvety smooth. Use a large plate to lay down the bread slices to soak up all the mixture evenly. 


Let the bread slice soak for at least 5 minutes or longer. In this way, the mixture will be soaked into the middle  of the bread and thus making it moister all around. 


Once you add the bread, do not move it  for about a 1/2 minute,  so the mixture will solidify to the bread. If you move it at this stage, then it will go all over the place and  make a mess.   


Now go ahead and add your favorite toppings and make it your way. Do not forget to make extra because your family will ask for more and you do not want to run out. 


***********************************************************************************************************


The Best French Toast Recipe
Video


If You Liked This Video, Then You Will Love These Below: 
By Cookingaround.


Blueberry Pancakes Recipe
Video


Eggs Benedict - My Way 
Video


Bacon And Eggs  -  My Way
Video


Please share with your Family and Friends below; 


Thursday, October 22, 2015

Apple Roses Bake Recipe


Apple Roses Bake Recipe

Well, it was raining for about three days straight and I really needed something to change my mood from being stuck indoors. After checking the food storage area, I found that I still had a lot of apples from my garden. 

So off to the kitchen to make these awesome aromatic Apple Roses. The problem I had was to make about a dozen or so, but as they came out of the oven filling the air with baked apple and cinnamon, they did not even make it to a plate. They disappeared as fast as I could make them.

I hope you will try this recipe and let me know how it turned out and did you add anything different to it.


*************************************************************************************************************


Recipe; 

2 to 3 - Apples
1 to 2 Pkg. - Pre-ready pastry dough (makes 6 to 8 pieces each)
1 to 1 1/2 Ltrs or 3 to 4 pints of water
1/2 - Juice of a lemon

Cinnamon as needed
Powdered sugar as needed

Makes about 12 to 18 Apple Roses


For more information, please see the video below;


*************************************************************************************************************


By using apples that have more red in it, it gives off a nicer color like a rose.  Here I use a combination of different colors just to have more variety to show on the video. 


If you do not like to use the microwave oven for this stage then you can boil the water with the lemon and apples for about 3 minutes. Either way, it will work out.


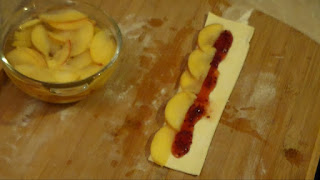
In the video, I am using a homemade raspberry jam that was from my garden. Now go ahead and add really any type of jam that you would like. 


If you would like a lighter pastry, then you can roll the dough a little, but I find that I like it the way it was made.

By making the roses a little smaller, then you could get about 4 sections from each side by slicing 3 horizontal and 1 vertical. This will give you 8 sections. 


Please do not overfill the sections with jam and apples, for it will make it harder for you to roll it and the jam will boil off everywhere and make a mess. 


You can find that as you start to roll the rose, the apples will try to move out of position. Keep one of your fingers on the top of the apple slices as you roll and that will keep them in place. 

Remember "practice makes perfect". 


Use a Teflon baking dish or make sure that you pre-treat it before you bake it so the roses will just slide off. 


*************************************************************************************************************


Apple Roses Bake Recipe
Video


If You Liked This Video Then You Will Love These. 
By Cookingaround;


Apple Tarts - My Way
Video


Pizza Apple Pie
Video


Apple Cinnamon Loaf
Video


Please share with your Family and Friends, below;

Thursday, October 1, 2015

Blueberry Pancakes Recipe


Blueberry Pancakes Recipe


I have to say that "I just love Pancakes" and for me I add many different toppings from almost every fruit, berries, and even chocolate syrup. 

After making many of them, I found out that I can really make a huge batch in a matter of minutes, mind you that would use two pans with about 3 pancakes in each. So do not be afraid to try this recipe for it is really that easy, you can not go wrong. 

My guests and family that have a sleepover in my home, just love to wake up to a huge plate of these awesome pancakes. The only problem I have, is keeping up with their appetite. After all, they want to try it in many different ways, for I make sure there are enough batter and toppings. Always the best way to start the morning.    

Let us know how your pancakes turned out and what other topping did you try.


**********************************************************************************************************


Recipe:

1 1/2 Cups - All-purpose flour
1/2 Cup - Milk, plus more as needed
1 Tsp. - White or brown sugar
1 Tsp. - Baking powder
1 Tbsp. - Cooking oil or butter
1 Tsp. - Salt
1 - Egg

Makes   2 Pancake servings.

Topping
3/4 Cups - Blueberries


For more information, please see the video below.


**********************************************************************************************************


In the video, I am using all-purpose flour, but if you want you can use a 50/50 of whole and regular flour. 

Also,  try it with about 25% buckwheat or even instant oatmeal. Anyway, you make it, it will be awesome. 


After adding the 1/2 cup of milk, keep adding more milk a little at a time. In this way, you will always have control of the thickness of the pancake. 

Keep stirring and adding milk until the batter sticks to your whisk but flows down slowly in a steady stream and off your whisk. Remember not over stir the batter, stop when it reaches the above point.  


Use a Teflon pan and make your life a lot easier, Now you do not have to add any oil to this type of pan and it will work well, but after a while, they just do not do the job as good as when it was new. So I find by using a little oil, it helps it along, cook more evenly and the pancakes look better


I make my pancakes a little bit on the smaller side because I like them to be piled up high, for me it just looks better. Now really the size depends on the preference that suits you. Larger or smaller will not change the taste, only the appearance.


When you see the bubbles coming to the surface of the batter, then you know that it is time to flip it over. Now, if you are not sure of the timing of your pancake, then when you see the above, just it is a pick under it one or two times. After a few, you get the hang of it and become an expert. 


Remember, do not push the pancake down and try to flatten it, for it will make them chewy and hard.


**********************************************************************************************************


Blueberry Pancakes Recipe
Video


If You Like This Video, Then You Will Love These. 
By Cookingaround.


Potato Pancakes
Video


Polish Potato Pancakes
Video


Pancakes  Old  Fashion
Video


Please share with your Family and friends, below; 

Monday, June 8, 2015

Mushroom Breadsticks - Pierogi Szwedzkie


Mushroom Breadsticks - Pierogi Szwedzkie


I remember when my Girlfriend  took me to a restaurant in Krakow Poland for the first time that served a very  strange pierogi. It was on display and it looked like something I never saw before. Being, at least  2 feet long I thought, how can they make any money just selling this funny mushroom breadstick. 

As it turned out, it was really a great meal, and I have to say that the place seemed to be full all the time, everyone gobbling  the thing down.   It was quite an experience and I have to admit that I did go back a few times. 

That is why I just had to come home and copycatted the recipe. Now that was not easy, but I stuck to it and it came out awesome like the real thing. it may not be as long as theirs  but just as tasty. 

Go ahead and try it, I am sure that it will be a pleaser. Please let me know how yours turned out. 


*************************************************************************************************************


Recipe:

1 lbs. -  Button or any type mushrooms
1/2 Cup - Butter
1 - Medium - Onion
1 Tsp. - Vinegar
1/2 Tsp. - Salt
1/2 Tsp. - Pepper


Topping 
1 - Egg yolk
Splash of water.

Black cumin as needed


Dough
Ready-made or homemade

2 cups - All purpose flour
1 Pkg. - Yeast
Pinch of salt
Splash of milk
2 Tsp. - Cooking oil
Water as needed


For more information please see the video below; 


*************************************************************************************************************


It is very important to let most of the water to evaporate from the mushrooms. I would say about 90% of it. Please do not think of draining the excess water and being done with it, because that is where the flavour is and I want to keep it in the mushroom, not down the drain.

Keep the mushroom piled in the middle and that will make the drying process go faster.Keep on stirring on the sides and piling it.  


Only add the butter and vinegar when the water has evaporated. If you skip this process, then your mushrooms will be very soggy and have no taste.


To make your life easier you can buy the ready-mix dough at your Supermarket or you make it from scratch. Here I used my food processor to mix up my dough then I let it rest for about 2 hours.


Your dough should be as thin as possible because you do not want a large puffy crust but a nice smooth and round finish.


Now you do not have to use the cardboard stencil like I did here, but I find this keeps them the same size. It takes out the guessing game of trying it free hand. 


Make a line with your mushroom mix and please try not to spread it around too much because then it will make  it harder to lock in the dough with mushroom at the sealing point. 

If you find that the dough slices have shrunken a bit, then just roll it a few times to get it back to its shape.


Now just roll it over and tap it in. making sure that the mushroom is in the rolled part.


Just roll the whole thing over and there you go, a perfect  breadstick.


Here I am using cornmeal so the dough will not stick when I am baking it. Now you can use other methods or even baking papers. 


Add the egg wash to  the tops of the sticks. Now I usually do not do the sides because I find that the yolk  accumulates at the bottom of the breadstick and burns during the baking. So I just cover the sides. 


Now to top it off "The Black Cumin". This gives a nice around taste  to this dish and this type of cumin is good for you. It just finishes it off to a perfect Breadstick. 


Your friends and Family will all love this recipe.

That I promise.


*************************************************************************************************************


Mushroom Breadsticks - Pierogi Szwedzkie
Video


Now If You Liked This Video Then You Will Love These.
 By: Cookingaround 


Mushroom Sauce  for Pasta
Video


Russian Perogies - Rosyjski Pierogi
Video


Magic Diet Soup -  The In-Between Soup  # 1
Video


Please Share with your Friends and family, below; 

Related Posts Plugin for WordPress, Blogger...